How to index or noindex the pages of your website on Webflow?
Discover step by step why and how to effectively index or noindex some of your pages of your site and thus improve your natural referencing and sitemap.
What is indexing and why is it important?
Indexing is an essential process in the world of natural referencing (SEO) and the web in general. It refers to how search engines, such as Google, discover, analyze, and distribute web pages to make them accessible to users when they search.
Here are a few key points:
- Be visible: Indexing your page is the first step for a web page to appear in search results. Without indexing, this same page will be invisible to the eyes of crawlers (small robots that scan the content of your site) and there will therefore be a good chance that Internet users will never come across it.
- Relevance and Rating: As said above, during indexing, search engines analyze the content of your site to determine its relevance to certain queries. This directly influences the ranking of your site in the search results.
- Content Update: Indexing is not a one-size-fits-all process. Search engines regularly reindex sites to capture updates and new content, ensuring that users find the most current and relevant information. You can even request manual indexing via your Google Search Console (step 6) to speed up the process.
How to optimize the indexing of your pages on Webflow?
Whether you are an experienced Webflow developer or a beginner, these few tips will help you maximize the visibility of your site.
In order to fully understand the challenge and the usefulness of what we do, you should know that when the crawlers scan your site you have a”Crawl budget“that these robots will distribute between all of your pages. So all the interest is his Indicate which pages to visit and which not to visit in order to make him better understand your business and therefore reach your target.
Step 1: Fill in the robots.txt
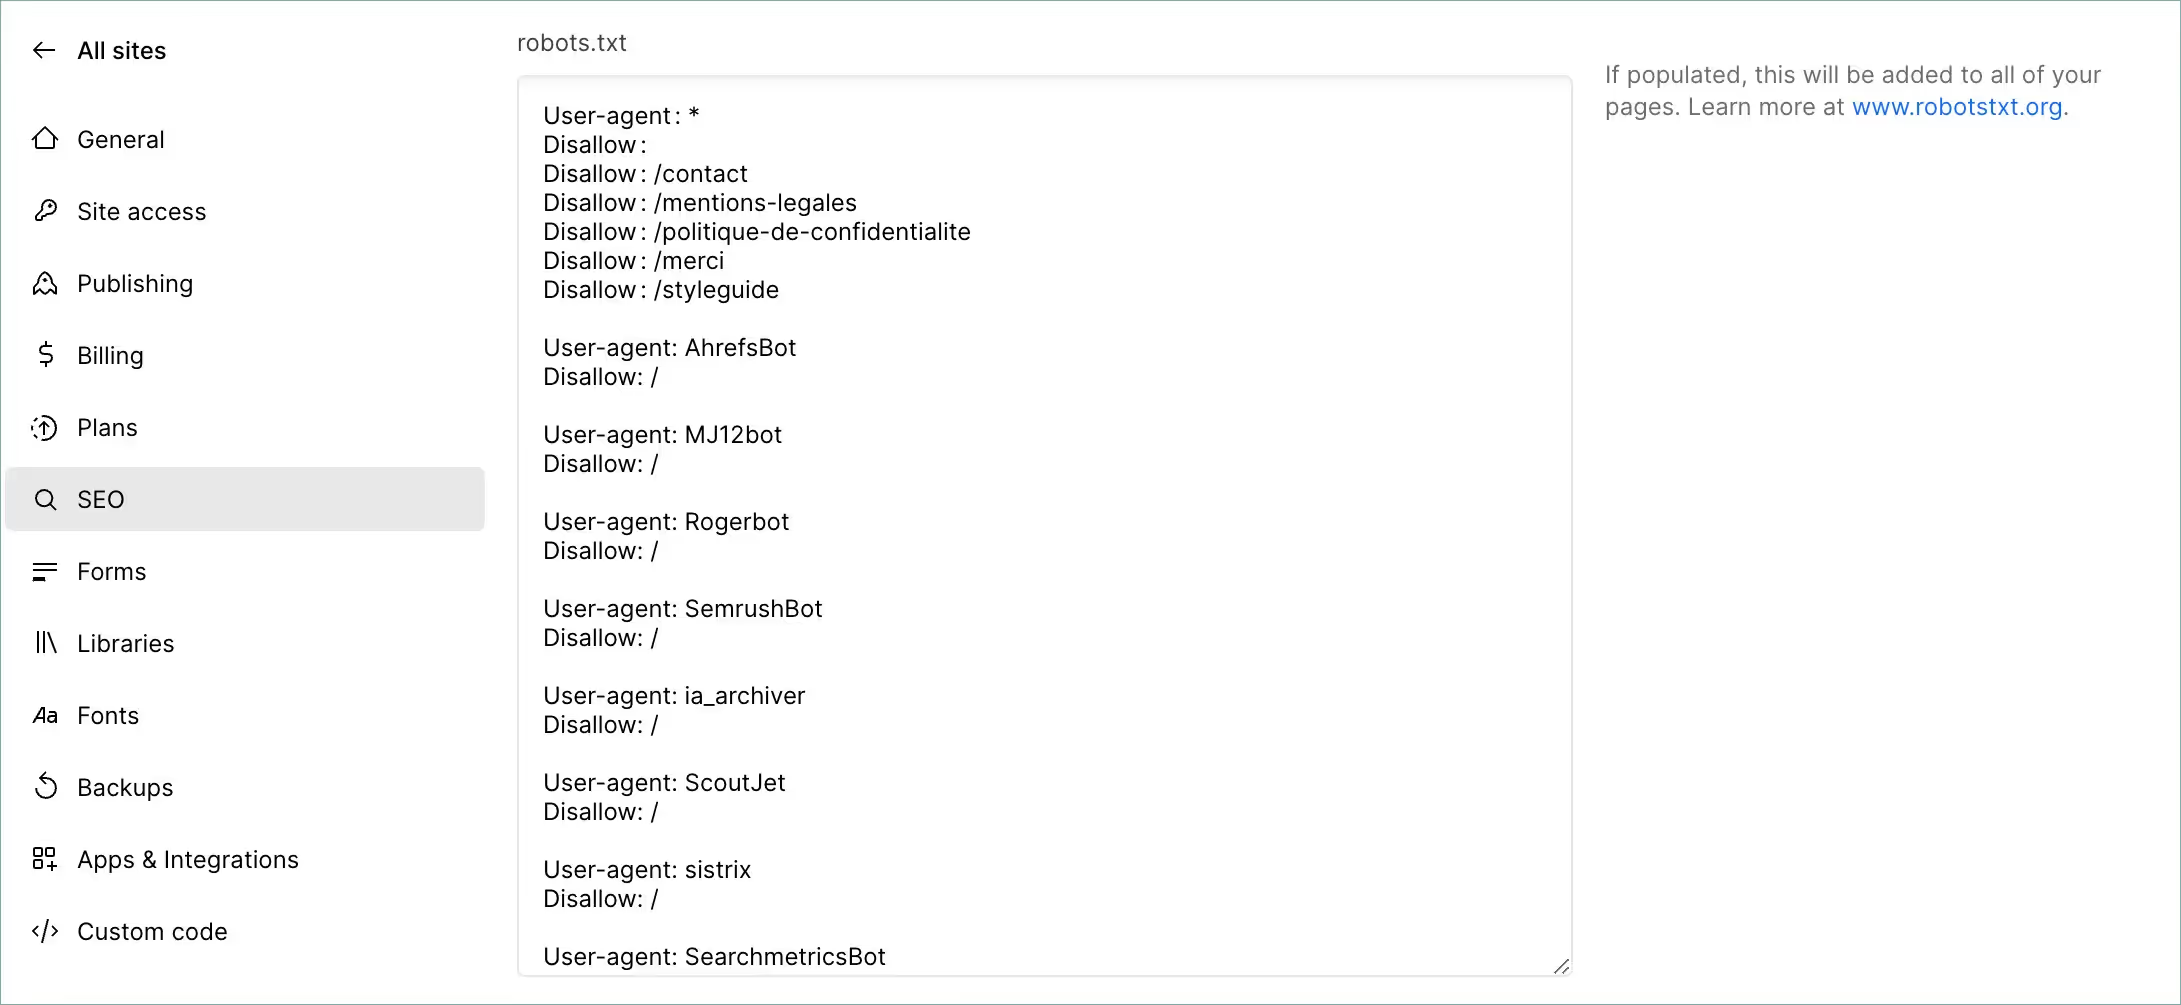
Go to the settings of your Webflow project and select the “SEO” tab. There you will find a block called”robots.txt“and that's where we're going to start.
The simplest version and the one that is most used is to indicate that you allow robots to visit and analyze all your URLs. The command is as follows:
User agent: *
Disallow:
However, sometimes it may be a good idea to block access to certain pages whose content is not relevant in order to optimize your crawl budget. To do this, you only have to manually add the URLs that you do not want to authorize, as in the following image (here we are therefore blocking access to the contact pages, legal notices...). ):

And that's it! You have created your robots.txt! Do not hesitate to go further with the official Google documentation on this subject.
Step 2: Activate the sitemap
In order to have a site map automatically updated on your site it is very simple. Also in the SEO tab, find the “Sitemap” block and activate it.

Once done you can consult it on www.yoursite.com/sitemap.xml
What is the difference between the sitemap and the robots.txt
The Sitemap is a file that lists all the important pages on a site to guide search engines, while the robots.txt file tells search engine robots which pages not to index.
Step 3: Remove irrelevant pages from your sitemap
You now have the ability to target certain pages or collections in your sitemap in order to exclude them from it and make your sitemap more relevant.
A very frequent use case is for example the removal of the sitemap from a “customer logos” type collection. Indeed, these logos will only be used to be displayed here and there on our site but they will not have a dedicated page.
Option 1: Webflow deindexing
Recently, Webflow (discover Webflow) and what in fact offers us this possibility via a simple switch in the page settings:
So simply go to your “Designer” mode, find your page and/or collection then click on “page settings”:

Option 2: Manual deindexing
If you prefer exclude the URL from the sitemap yourself nothing could be simpler. Also in “page settings” find the “Inside < head > tag” block and paste the following line:
<meta name=” robots” content=” noindex, nofollow” >
Step 4: Exclude your webflow.io subdomain from indexing
The last step on Webflow in this article is very important and puts your SEO at risk if it is not done.
Simply go back to your project settings on the SEO tab then check”Disable Webflow subdomain indexing“.
If you don't check this feature, search engines will ignore your website and focus on the webflow subdomain (www.mysite.webflow.io).
Step 5 (bonus): Submit your sitemap on Google Search Console
In order to speed up the indexing of your site or a new URL such as a blog post, you can notify Google to go back to your sitemap in order to explore the new pages.
Here's how to do it:
- Sign in to your Google Search Console account.
- Select your site.
- Click on the “Sitemaps” tab in the left column
- Enter your sitemap URL (ex: https://www.monsite.com/sitemap.xml)
- Click “Send.”
Tip: To find out if your page is well indexed you can type in the Google search bar “site:www.monsite.com/monurl”. If your page is visible, it is well indexed!
Explore my latest posts
Take a few minutes to read the latest articles on my blog and learn about the latest news and trends in the world of Webdesign and No-code.


